
Entryとは?
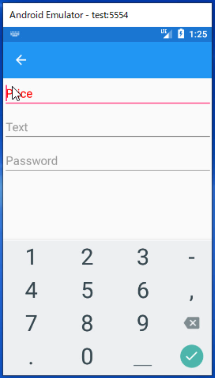
EntryとはWindowsFormsで言うところのテキストボックスですね。数値や文字を入力できます。テキスト入力エリアに,薄いグレーでその入力エリアに何を入力するかを示す文言を表示しておくことができます。入力を始めると消えてしまいますが,入力を始めるまでは表示されているため,その入力エリアがパスワードなのか,IDなのかを一目で識別することができます。またラベルとテキストボックスを並べるとどうしてもスペースが必要なのですが,このようにEntry上にラベルの要素も取り入れて表示することで省スペース化を実現できます。これはスマホアプリという限られたスペースのなかで表現するには非表示強力な表現方法となります。
Keyboard
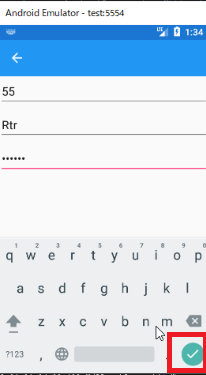
Entryには,それぞれキーボードを指定することができます。キーボードを指定しておくと,Entryに入力しようとしたときにAndroidなどではキーボードが表示されます。そのキーボードの入力方法を数値のキーボードや文字のキーボードを指定することができます。
キーボードには次のような区分を指定できます。
- Numeric
- Plain
- Chat
- Numeric
- Telephone
- Text
- Url
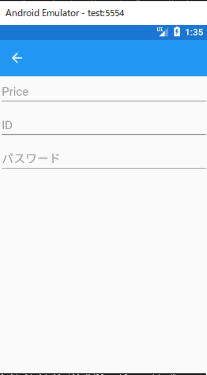
Placeholder
Placeholderに文字列を入力することで,Entry上に薄いグレーで文字を初期表示することができます。このガイドをもとにユーザーは入力することができます。
PlaceholderColor
Placeholderに指定した文字列はデフォルトでは薄いグレーですが,色はこのPlaceholderColorによって指定できます。
IsPassword
パスワード入力する場合はこのIsPasswordをTrueにすることで,文字を目隠しすることができます。
Completedイベント
EntryにCompletedイベントを登録しておくと,入力が完了した時点でイベント通知が行われます。
準備
今回はEntryPageというコンテンツページを作成して検証していきたいと思います。ここまで順番に解説をよんでいただいている方は,EntryPageという新規のコンテンツページを作って,ControlsPageから呼び出せるようにしてください。ここから初めて読んでいる方は,Xamarin.Formsのデフォルトで作成されるMainPageにEntryPageの実装をして問題ありません。
using System.Collections.Generic;

using Xamarin.Forms;
using Xamarin.Forms.Xaml;
using XSample.Objects;

namespace XSample.Pages
{
    [XamlCompilation(XamlCompilationOptions.Compile)]
    public partial class ControlsPage : ContentPage
    {
        public ControlsPage()
        {
            InitializeComponent();

            var items = new List<MenuDto>();
            items.Add(new MenuDto("SwitchPage", "Switchの使い方", "mail.png"));
            items.Add(new MenuDto("EntryPage", "Entryは1行の入力に使う", "mail.png"));
            MyListView.ItemsSource = items;
        }

        private void MyListView_ItemTapped(object sender, ItemTappedEventArgs e)
        {
            var item = e.Item as MenuDto;
            if (item.Title == "SwitchPage")
            {
                Navigation.PushAsync(new SwitchPage());
            }
            else if (item.Title == "EntryPage")
            {
                Navigation.PushAsync(new EntryPage());
            }
        }
    }
}
EntryPageの追加
<?xml version="1.0" encoding="utf-8" ?>
<ContentPage xmlns="http://xamarin.com/schemas/2014/forms"
             xmlns:x="http://schemas.microsoft.com/winfx/2009/xaml"
             x:Class="XSample.Pages.EntryPage">
    <ContentPage.Content>
        <StackLayout>
            <Entry Keyboard="Numeric"  Placeholder="Price" PlaceholderColor="Red"/>
            <Entry Keyboard="Text" Placeholder="Text"/>

            <Entry IsPassword="True"
                   Placeholder ="Password"
                   Keyboard="Text"
                   Completed="Password_Completed"/>
            <!--<Entry Keyboard="Numeric" Placeholder="Phone"/>
            <Entry Keyboard="Plain" Placeholder="Plain"/>
            <Entry Keyboard="Chat" Placeholder="Chat"/>
            <Entry Keyboard="Default" Placeholder="Default"/>
            <Entry Keyboard="Email" Placeholder="Email"/>
            <Entry Keyboard="Numeric" Placeholder="Numeric"/>
            <Entry Keyboard="Telephone" Placeholder="Telephone"/>
            <Entry Keyboard="Text" Placeholder="Text"/>
            <Entry Keyboard="Url" Placeholder="Url"/>-->
        </StackLayout>
    </ContentPage.Content>
</ContentPage>
Keyboardに”Numeric”や”Text”を設定しています。前述の区分から用途に適したものを指定してください。Placeholderで薄いグレーの文字を表示します。パスワードの目隠しをする項目はIsPasswordをTrueにしておきます。Password_Completedイベントを受けることで,パスワードの入力チェック等の記述が行えます。
- C#Xamarin.Formsでスマホ開発#01プロジェクト作成の方法
- C#Xamarin.Formsでスマホ開発#02プロジェクトの実行【Android実機編】
- C#Xamarin.Formsでスマホ開発#03エミュレーターでのAndroid接続
- C#Xamarin.Formsでスマホ開発#04 UWPの実行
- C#Xamarin.Formsでスマホ開発#05マルチスタートアッププロジェクトの設定
- C#Xamarin.Formsでスマホ開発#06 StackLayoutの使い方を解説
- C#Xamarin.Formsでスマホ開発#07 VerticalOptionsとHorizontalOptionsの使い方
- C#Xamarin.Formsでスマホ開発#08文字色&背景色とFontsizeの使い方
- C#Xamarin.Formsでスマホ開発#09 Gridの使い方
- C#Xamarin.Formsでスマホ開発#10画面遷移のやり方
- C#Xamarin.Formsでスマホ開発#11 TabbedPageの作り方
- C#Xamarin.Formsでスマホ開発#12 TabbedPageの中身の作り方
- C#Xamarin.Formsでスマホ開発#13 MasterDetailPageの作り方
- C#Xamarin.Formsでスマホ開発#14 ListViewの作り方
- C#Xamarin.Formsでスマホ開発#15 CarouselPageの作り方
- C#Xamarin.Formsでスマホ開発#16 DisplayAlertの使い方
- C#Xamarin.Formsでスマホ開発#17 DisplayActionSheetの使い方
- C#Xamarin.Formsでスマホ開発#18 Deviceごとの処理切り替え方法
- C#Xamarin.Formsでスマホ開発#19 LoadとCloseに代わるもの
- C#Xamarin.Formsでスマホ開発#20 戻るボタンを非表示にする
- C#Xamarin.Formsでスマホ開発#21 ViewCellの共通化のやり方
- C#Xamarin.Formsでスマホ開発##22 Switchの使い方を解説
- C#Xamarin.Formsでスマホ開発#23 コントロールをデータバインドする方法
- C#Xamarin.Formsでスマホ開発#24 Sliderの使い方を解説
- C#Xamarin.Formsでスマホ開発#25 Stepperの使い方を解説
- C#Xamarin.Formsでスマホ開発#26 Entryの使い方を解説
- C#Xamarin.Formsでスマホ開発#27 Editorの使い方を解説
- C#Xamarin.Formsでスマホ開発#28 Pickerの使い方を解説
- C#Xamarin.Formsでスマホ開発#29 Pickerでデータバインディングする方法
- C#Xamarin.Formsでスマホ開発#30 DatePickerとTimePickerの使い方
- C#Xamarin.Formsでスマホ開発#31 SearchBarの使い方を解説
- C#Xamarin.Formsでスマホ開発#32 ToolbarItemの使い方を解説
- C#Xamarin.Formsでスマホ開発#33 TableViewの使い方を解説
- C#Xamarin.Formsでスマホ開発#34 ActivityIndicatorの使い方を解説
- C#Xamarin.Formsでスマホ開発#35 ListViewを下に引っ張て更新する方法