ListViewのフィルタリングとは?
ListViewにすべての行が表示されていると不都合が生じることがあります。例えば、一覧にリストされている項目が多い場合は、特定の行を探すのに手間がかかってしまいます。その場合、任意の文字などでフィルタリングをすることで、必要な情報だけが表示され、非常に使いやすくなります。
サンプルコード
次の例では、Customerクラスの一覧を表示しているListViewに検索用テキストボックスを設置し、その検索用テキストボックスに入力された文字をCustomerのNameに含んでいる行のみが表示されるようにフィルタリングをしています。フィルタリングはLinq機能のWhereを使用しています。
namespace WPF011
{
    public class Customer
    {
        public int Id { get; set; }
        public string Name { get; set; }
        public string Phone { get; set; }

        public override string ToString()
        {
            return $"{Id} - {Name} - {Phone}";
        }
    }
}
<Window x:Class="WPF011.MainWindow"
        xmlns="http://schemas.microsoft.com/winfx/2006/xaml/presentation"
        xmlns:x="http://schemas.microsoft.com/winfx/2006/xaml"
        xmlns:d="http://schemas.microsoft.com/expression/blend/2008"
        xmlns:mc="http://schemas.openxmlformats.org/markup-compatibility/2006"
        xmlns:local="clr-namespace:WPF011"
        mc:Ignorable="d"
        Title="MainWindow" Height="400" Width="400">
    <Grid>
        <StackPanel Margin="10">
            <Button x:Name="AddButton"
                    Content="Add"
                    FontSize="30"
                    Click="AddButton_Click"/>

            <TextBox x:Name="SearchTextBox"
                     FontSize="20"
                     TextChanged="SearchTextBox_TextChanged"/>

            <ListView x:Name="CustomerListView"
                      Margin="0,5,0,0"
                      Height="250">
                <ListView.ItemTemplate>
                    <DataTemplate>
                        <StackPanel>
                            <TextBlock Text="{Binding Id}"/>
                            <TextBlock Text="{Binding Name}" FontSize="20"/>
                            <TextBlock Text="{Binding Phone}" Foreground="Blue"/>
                        </StackPanel>
                    </DataTemplate>
                </ListView.ItemTemplate>
            </ListView>

        </StackPanel>
    </Grid>
</Window>
SearchTextBoxを追加して、ClickイベントSearchTextBox_TextChangedを生成しています。
using System.Collections.ObjectModel;
using System.Linq;
using System.Windows;
using System.Windows.Controls;

namespace WPF011
{
    /// <summary>
    /// MainWindow.xaml の相互作用ロジック
    /// </summary>
    public partial class MainWindow : Window
    {
        private ObservableCollection<Customer> _customers = new ObservableCollection<Customer>();
        private int _index = 0;
        public MainWindow()
        {
            InitializeComponent();

            _customers.Add(
new Customer { Id = ++_index, Name = "name" + _index, Phone = "phone" + _index });
            _customers.Add(
new Customer { Id = ++_index, Name = "name" + _index, Phone = "phone" + _index });
            _customers.Add(
new Customer { Id = ++_index, Name = "name" + _index, Phone = "phone" + _index });
            _customers.Add(
new Customer { Id = ++_index, Name = "name" + _index, Phone = "phone" + _index });
            _customers.Add(
new Customer { Id = ++_index, Name = "name" + _index, Phone = "phone" + _index });
            _customers.Add(
new Customer { Id = ++_index, Name = "name" + _index, Phone = "phone" + _index });
            _customers.Add(
new Customer { Id = ++_index, Name = "name" + _index, Phone = "phone" + _index });
            _customers.Add(
new Customer { Id = ++_index, Name = "name" + _index, Phone = "phone" + _index });
            _customers.Add(
new Customer { Id = ++_index, Name = "name" + _index, Phone = "phone" + _index });
            _customers.Add(
new Customer { Id = ++_index, Name = "name" + _index, Phone = "phone" + _index });
            _customers.Add(
new Customer { Id = ++_index, Name = "name" + _index, Phone = "phone" + _index });
            _customers.Add(
new Customer { Id = ++_index, Name = "name" + _index, Phone = "phone" + _index });
            _customers.Add(
new Customer { Id = ++_index, Name = "name" + _index, Phone = "phone" + _index });
            _customers.Add(
new Customer { Id = ++_index, Name = "name" + _index, Phone = "phone" + _index });
            _customers.Add(
new Customer { Id = ++_index, Name = "name" + _index, Phone = "phone" + _index });

            CustomerListView.ItemsSource = _customers;
        }

        private void AddButton_Click(object sender, RoutedEventArgs e)
        {
            _customers.Add(new Customer { Id = ++_index, Name = "name" + _index, Phone = "phone" + _index });
            //CustomerListView.ItemsSource = _customers;
        }

        private void SearchTextBox_TextChanged(object sender, TextChangedEventArgs e)
        {
            var filterList =
                _customers.Where(x => x.Name.Contains(SearchTextBox.Text)).ToList();
            CustomerListView.ItemsSource = filterList;
        }
    }
}
コンストラクタで、_customersインスタンスに15件のCustomerクラスのインスタンスを追加しています。SearchTextBox_TextChangedではLinq機能を使用してSearchTextBoxのTextプロパティの文字列を含んでいる行のみを取得し、ListViewのItemsSourceに設定しています。
<フィルタリングなし> 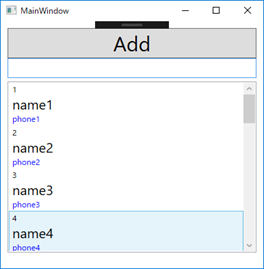 <文字列「2」でフィルタリングした状態>
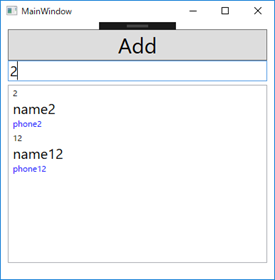
- C#WPFの道#1!WPFのプロジェクト作成方法をわかりやすく解説!
- C#WPFの道#2!StackPanelの使い方をわかりやすく解説!
- C#WPFの道#3!Gridの使い方をわかりやすく解説!
- C#WPFの道#4!コントロールの名前の付け方をわかりやすく解説!
- C#WPFの道#5!イベントの定義の仕方をわかりやすく解説!
- C#WPFの道#6!リソースとStaticResourceの定義と使い方をわかりやすく解説!
- C#WPFの道#7!コントロールのスタイル定義のやり方をわかりやすく解説!
- C#WPFの道#8!グループごとのスタイル定義とBasedOnでの継承のやり方!
- C#WPFの道#9!SQLiteの使い方をわかりやすく解説!
- C#WPFの道#10!ListViewの使い方をわかりやすく解説!
- C#WPFの道#11!ListViewのフィルタリングの方法を解説!
- C#WPFの道#12!SQLiteとListViewでマスタ設定画面の作成!
- C#WPFの道#13!Buttonに画像と文字を並べる方法とRepeatButtonとToggleButton
- C#WPFの道#14!CheckBoxとIsThreeState、Indeterminateの使い方
- C#WPFの道#15!RadioButtonの書き方と使い方を解説
- C#WPFの道#16!Expanderの書き方と使い方を解りやすく解説
- C#WPFの道#17!GroupBoxの書き方と使い方を解りやすく解説
- C#WPFの道#18!Slider(スライダー)の書き方と使い方を解りやすく解説
- C#WPFの道#19!ProgressBarの書き方と使い方を解りやすく解説
- C#WPFの道#20!ComboBoxの書き方と使い方を解りやすく解説
- C#WPFの道#21!ListBoxの書き方と使い方を解りやすく解説
- C#WPFの道#22!TabControlの書き方と使い方を解りやすく解説
- C#WPFの道#23!TreeViewの書き方と使い方を解りやすく解説
- C#WPFの道#24!TextBlock,TextBoxの改行と文字の加工を解説
- C#WPFの道#25!Menuの書き方と使い方をわかりやすく解説!
- C#WPFの道#26!ToolBarの書き方と使い方をわかりやすく解説!
- C#WPFの道#27!StatusBarの書き方と使い方をわかりやすく解説!
- C#WPFの道#28!WrapPanelの書き方と使い方をわかりやすく解説!
- C#WPFの道#29!DockPanelの書き方と使い方をわかりやすく解説!
- C#WPFの道#30!Canvasの書き方と使い方をわかりやすく解説!