これまでの知識のまとめ
ListViewを学んだので、SQLiteと組み合わせることで、ある程度のアプリケーションを作ることができます。これまで学んだ知識のまとめとして、マスター設定画面の作成をしてみましょう。腕試しとして、次の仕様だけを見てご自身で一度プログラミングしてみることをお勧めします。どうしてもわからない場合は解説を見ながら一緒にコーディングしてみてください。ただ、データの更新と削除はまだ解説していないので、解説を見てください。
仕様
<一覧画面>
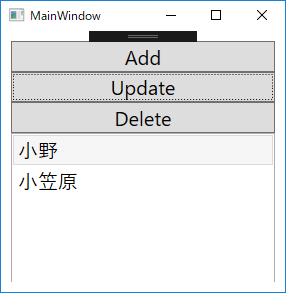
| Addボタン | Save画面の起動 |
|---|---|
| Updateボタン | Save画面の起動 |
| Deleteボタン | ListViewで選択されているCustomerテーブルの行削除 |
| 一覧(ListView) | Customerテーブルの一覧を表示 |
<Save画面>
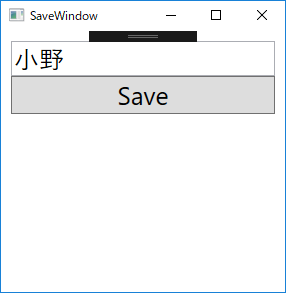
| テキストボックス |
Customerの名前を表示 |
|---|---|
| Saveボタン |
AddモードのときはCustomerの新規追加 |
Customerテーブル(SQLite)
| Id | ID |
|---|---|
| Name | 名前 |
実装例
App.xaml
using System;
using System.Windows;

namespace WPF012
{
    ///
    /// App.xaml の相互作用ロジック
    ///
    public partial class App : Application
    {
        static string databaseName = "Shop2.db";
        static string folderPath = Environment.GetFolderPath(Environment.SpecialFolder.MyDocuments);
        public static string DatabasePath = System.IO.Path.Combine(folderPath, databaseName);

    }
}
App.xamlにはSQLiteの接続先を定義します。場所は任意の場所で問題ありません。
Customerクラス
using SQLite;

namespace WPF012
{
    public class Customer
    {
        public Customer()
        {

        }

        public Customer(string name)
        {
            Name = name;
        }

        public Customer(int id ,string name)
        {
            Id = id;
            Name = name;
        }

        [PrimaryKey, AutoIncrement]
        public int Id { get; set; }
        public string Name { get; set; }
    }
}
CustomerクラスはIdとNameのみを定義します。コンストラクタは用途別に3種類定義しています。コンストラクタは記述しなくても問題はありません。インスタンスを生成時に値を指定するほうがコードがわかりやすくなるためそうしています。
MainWindow.xaml
<Window x:Class="WPF012.MainWindow"
        xmlns="http://schemas.microsoft.com/winfx/2006/xaml/presentation"
        xmlns:x="http://schemas.microsoft.com/winfx/2006/xaml"
        xmlns:d="http://schemas.microsoft.com/expression/blend/2008"
        xmlns:mc="http://schemas.openxmlformats.org/markup-compatibility/2006"
        xmlns:local="clr-namespace:WPF012"
        mc:Ignorable="d"
        Title="MainWindow" Height="300" Width="300">
    <Grid>
        <StackPanel Margin="10">
            <Button x:Name="AddButton"
                    FontSize="20"
                    Content="Add"
                    Click="AddButton_Click"/>
            <Button x:Name="UpdateButton"
                    FontSize="20"
                    Content="Update"
                    Click="UpdateButton_Click"/>
            <Button x:Name="DeleteButton"
                    FontSize="20"
                    Content="Delete"
                    Click="DeleteButton_Click"/>
            <ListView Height="150"
                      x:Name="CustomerListView">
                <ListView.ItemTemplate>
                    <DataTemplate>
                        <TextBlock Text="{Binding Name}"
                                   FontSize="20"/>
                    </DataTemplate>
                </ListView.ItemTemplate>
            </ListView>
        </StackPanel>
    </Grid>
</Window>
MainWindowではStackPanel上に、Add、Update、DeleteボタンとListViewを設置しています。
MainWindow.xaml コードビハインド側
using SQLite;
using System.Windows;

namespace WPF012
{
    /// <summary>
    /// MainWindow.xaml の相互作用ロジック
    /// </summary>
    public partial class MainWindow : Window
    {
        public MainWindow()
        {
            InitializeComponent();
            ReadDatabase();
        }

        private void AddButton_Click(object sender, RoutedEventArgs e)
        {
            var f = new SaveWindow(null);
            f.ShowDialog();
            ReadDatabase();
        }

        private void UpdateButton_Click(object sender, RoutedEventArgs e)
        {
            var item = CustomerListView.SelectedItem as Customer;
            if(item == null)
            {
                MessageBox.Show("行を選択してください");
                return;
            }

            var f = new SaveWindow(item);
            f.ShowDialog();
            ReadDatabase();
        }

        private void DeleteButton_Click(object sender, RoutedEventArgs e)
        {
            var item = CustomerListView.SelectedItem as Customer;
            if (item == null)
            {
                MessageBox.Show("行を選択してください");
                return;
            }

            using (var connection = new SQLiteConnection(App.DatabasePath))
            {
                connection.CreateTable<Customer>();
                connection.Delete(item);
                ReadDatabase();
            }
        }

        private void ReadDatabase()
        {
            using (var connection = new SQLiteConnection(App.DatabasePath))
            {
                connection.CreateTable<Customer>();
                CustomerListView.ItemsSource = connection.Table<Customer>().ToList();
            }
        }
    }
}
Addボタン押下時はCustomerをNullでSave画面を起動。Update時は選択されている行のCustomerクラスを引数に渡しています。ListViewの選択行はSelectedItemで取得します。選択されていないときはNullになるため、Nullチェックも行っています。 Updateボタン押下時は選択行のCustomerクラスを引数としてSave画面を起動しています。Deleteボタン押下時は選択行のCustomerクラスを削除しています。削除はconnection.Deleteで実行しています。
SaveWindow.xaml
<Window x:Class="WPF012.SaveWindow"
        xmlns="http://schemas.microsoft.com/winfx/2006/xaml/presentation"
        xmlns:x="http://schemas.microsoft.com/winfx/2006/xaml"
        xmlns:d="http://schemas.microsoft.com/expression/blend/2008"
        xmlns:mc="http://schemas.openxmlformats.org/markup-compatibility/2006"
        xmlns:local="clr-namespace:WPF012"
        mc:Ignorable="d"
        Title="SaveWindow" Height="300" Width="300">
    <Grid>
        <StackPanel Margin="10">
            <TextBox x:Name="NameTextBox"
                     FontSize="20"/>
            <Button Content="Save"
                    x:Name="SaveButton"
                    FontSize="20"
                    Click="SaveButton_Click"/>
        </StackPanel>
    </Grid>
</Window>
Save画面は名前のテキストボックスと、Saveボタンを設置しています。
SaveWindow.xaml コードビハインド側
using SQLite;
using System.Windows;

namespace WPF012
{
    /// <summary>
    /// SaveWindow.xaml の相互作用ロジック
    /// </summary>
    public partial class SaveWindow : Window
    {
        private Customer _customer;
        public SaveWindow(Customer customer)
        {
            InitializeComponent();

            _customer = customer;

            if(customer != null)
            {
                this.NameTextBox.Text = customer.Name;
            }
        }

        private void SaveButton_Click(object sender, RoutedEventArgs e)
        {
            if(NameTextBox.Text.Trim().Length < 1)
            {
                MessageBox.Show("名前を入力してください");
                return;
            }

            using (var connection = new SQLiteConnection(App.DatabasePath))
            {
                connection.CreateTable<Customer>();
                if(_customer == null)
                {
                    connection.Insert(new Customer(NameTextBox.Text));
                }
                else
                {
                    connection.Update(new Customer(_customer.Id, NameTextBox.Text));
                }

                Close();
            }
        }
    }
}
Save画面のコンストラクタでは、Customerクラスを引数にしています。Nullの場合は新規追加、Null以外のときは、更新処理をしています。 更新処理はconnection.Updateで実行しています。 以上がサンプルコードとなります。
- C#WPFの道#1!WPFのプロジェクト作成方法をわかりやすく解説!
- C#WPFの道#2!StackPanelの使い方をわかりやすく解説!
- C#WPFの道#3!Gridの使い方をわかりやすく解説!
- C#WPFの道#4!コントロールの名前の付け方をわかりやすく解説!
- C#WPFの道#5!イベントの定義の仕方をわかりやすく解説!
- C#WPFの道#6!リソースとStaticResourceの定義と使い方をわかりやすく解説!
- C#WPFの道#7!コントロールのスタイル定義のやり方をわかりやすく解説!
- C#WPFの道#8!グループごとのスタイル定義とBasedOnでの継承のやり方!
- C#WPFの道#9!SQLiteの使い方をわかりやすく解説!
- C#WPFの道#10!ListViewの使い方をわかりやすく解説!
- C#WPFの道#11!ListViewのフィルタリングの方法を解説!
- C#WPFの道#12!SQLiteとListViewでマスタ設定画面の作成!
- C#WPFの道#13!Buttonに画像と文字を並べる方法とRepeatButtonとToggleButton
- C#WPFの道#14!CheckBoxとIsThreeState、Indeterminateの使い方
- C#WPFの道#15!RadioButtonの書き方と使い方を解説
- C#WPFの道#16!Expanderの書き方と使い方を解りやすく解説
- C#WPFの道#17!GroupBoxの書き方と使い方を解りやすく解説
- C#WPFの道#18!Slider(スライダー)の書き方と使い方を解りやすく解説
- C#WPFの道#19!ProgressBarの書き方と使い方を解りやすく解説
- C#WPFの道#20!ComboBoxの書き方と使い方を解りやすく解説
- C#WPFの道#21!ListBoxの書き方と使い方を解りやすく解説
- C#WPFの道#22!TabControlの書き方と使い方を解りやすく解説
- C#WPFの道#23!TreeViewの書き方と使い方を解りやすく解説
- C#WPFの道#24!TextBlock,TextBoxの改行と文字の加工を解説
- C#WPFの道#25!Menuの書き方と使い方をわかりやすく解説!
- C#WPFの道#26!ToolBarの書き方と使い方をわかりやすく解説!
- C#WPFの道#27!StatusBarの書き方と使い方をわかりやすく解説!
- C#WPFの道#28!WrapPanelの書き方と使い方をわかりやすく解説!
- C#WPFの道#29!DockPanelの書き方と使い方をわかりやすく解説!
- C#WPFの道#30!Canvasの書き方と使い方をわかりやすく解説!