
SearchBarとは?
SearchBarとは,Googleの検索エリアみたいな感じで,検索文字を入れるコントロールです。文字を入れるたびに検索を実行することもできますし,キーボードの右下の虫眼鏡ボタンを押したときに検索をさせることもできます。
準備
今回はSearchBarPageというコンテンツページを作成して検証していきたいと思います。ここまで順番に解説をよんでいただいている方は,SearchBarPage という新規のコンテンツページを作って,ControlsPageから呼び出せるようにしてください。ここから初めて読んでいる方は,Xamarin.Formsのデフォルトで作成されるMainPageにSearchBarPageの実装をして問題ありません。
using System;
using System.Collections.Generic;
using System.Linq;
using System.Text;
using System.Threading.Tasks;

using Xamarin.Forms;
using Xamarin.Forms.Xaml;
using XSample.Objects;

namespace XSample.Pages
{
    [XamlCompilation(XamlCompilationOptions.Compile)]
    public partial class ControlsPage : ContentPage
    {
        public ControlsPage()
        {
            InitializeComponent();

            var items = new List<MenuDto>();
            items.Add(new MenuDto("SwitchPage", "Switchの使い方", "mail.png"));
            items.Add(new MenuDto("SearchBarPage", "SearchBarの使い方", "mail.png"));
            MyListView.ItemsSource = items;
        }

        private void MyListView_ItemTapped(object sender, ItemTappedEventArgs e)
        {
            var item = e.Item as MenuDto;
            if (item.Title == "SwitchPage")
            {
                Navigation.PushAsync(new SwitchPage());
            }
            else if (item.Title == "SearchBarPage")
            {
                Navigation.PushAsync(new SearchBarPage());
            }
        }
    }
}
SearchBarPageの追加
Pagesフォルダーに新規追加でSearchBarPageという名前のコンテンツページを作成してください。作成されたらデフォルトのラベルを削除して,次のように記述します。
<?xml version="1.0" encoding="utf-8" ?>
<ContentPage xmlns="http://xamarin.com/schemas/2014/forms"
             xmlns:x="http://schemas.microsoft.com/winfx/2009/xaml"
             x:Class="XSample.Pages.SearchBarPage">
    <ContentPage.Content>
        <StackLayout>

            <SearchBar Placeholder="Search..."
                       TextChanged="SearchBar_TextChanged"
                       SearchButtonPressed="SearchBar_SearchButtonPressed"/>

            <ListView x:Name="MyListView">
                <ListView.ItemTemplate>
                    <DataTemplate>
                        <TextCell Text="{Binding Id}"
                                  Detail="{Binding ProductName}">

                        </TextCell>
                    </DataTemplate>
                </ListView.ItemTemplate>
            </ListView>
        </StackLayout>
    </ContentPage.Content>
</ContentPage>
Placeholder
SearchBarに何も入力していないときに表示されるガイド用の薄いグレーの文字に何を表示するかを設定します。「検索文字を入力してください…」など自由に設定できます。
TextChanged
テキストが変更された時に検索したい場合はこのイベントを実装して,文字が変わるたびに検索処理をすることができます。
SearchButtonPressed
虫眼鏡ボタンで確定したときにだけ検索したいのであれば,SearchButtonPressedイベントを実装します。通常はTextChangedかこちらのどちらかの実装のみでよいと思います。
ListView
ListViewは今回のレクチャーのメイン要素ではないのでサラッと記述します。TextCellというものを指定すると,「タイトル」と「詳細」を表示できる行を作成できます。今回はIdとProductNameを表示する一覧を作成する想定なので,その名前でバインドしておきます。
コードビハインド側の実装
using System;
using System.Collections.Generic;
using System.Collections.ObjectModel;
using System.Linq;
using System.Text;
using System.Threading.Tasks;

using Xamarin.Forms;
using Xamarin.Forms.Xaml;

namespace XSample.Pages
{
	[XamlCompilation(XamlCompilationOptions.Compile)]
	public partial class SearchBarPage : ContentPage
	{
        private ObservableCollection<ProductDto> _dtos = new ObservableCollection<ProductDto>();
		public SearchBarPage ()
		{
			InitializeComponent ();

            _dtos.Add(new ProductDto(1, "ABCDE"));
            _dtos.Add(new ProductDto(2, "AEEEEEE"));
            _dtos.Add(new ProductDto(3, "BCCCCCF"));
            MyListView.ItemsSource = _dtos;
		}

        private void SearchBar_TextChanged(object sender, TextChangedEventArgs e)
        {
            MyListView.ItemsSource = GetDto(e.NewTextValue);
        }

        private void SearchBar_SearchButtonPressed(object sender, EventArgs e)
        {

        }

        private IEnumerable<ProductDto> GetDto(string searchText = null)
        {
            if (string.IsNullOrEmpty(searchText))
            {
                return _dtos;
            }

            return _dtos.Where(x => x.ProductName.Contains(searchText));
        }
    }

    public sealed class ProductDto
    {
        public ProductDto(int id, string productName)
        {
            Id = id;
            ProductName = productName;
        }

        public int Id { get; set; }
        public string ProductName { get; set; }
    }
}
ProductDto
ProductDtoはListViewにバインドするためのクラスです。IdとProductNameだけのシンプルなクラスです。
ObservableCollection
ProductDtoをリストにするためのコレクションクラスです。_dtosという名前でインスタンスを作成し,コンストラクタでリストを生成してMyListViewにバインドしています。リストの中身は何でもいいのですが,今回の検索の検証がしやすいように「ABCDE」などの文字を入れています。
GetDto
_dtosを検索文字で絞り込んだリストを返却しています。文字が設定されていない場合は_dtosの内容そのままが返却されます。大文字小文字を区別しないのであれば,ToUpper関数を比較する両方の文字に適応すればよいでしょう。
TextChanged
SearchBarのテキストが変更されるたびに通知されます。イベント引数のe.NewTextValueに変更後の値が通知されるので,その値でGetDtoを呼び出し,結果をMyListViewに再度バインドしています。
SearchButtonPressed
虫眼鏡ボタンが押されたタイミングで通知されます。このタイミングで検索を行う場合はここで検索処理をします。
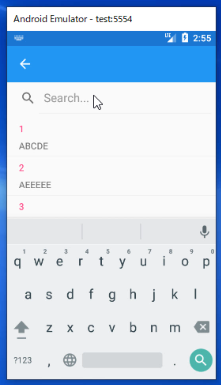
実行
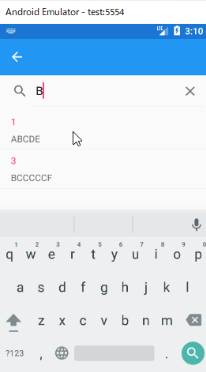
実行するとSearchBarとリストが表示されます。SearchBarに文字を入力すると,その文字を含む行だけが表示されるはずです。右下の虫眼鏡ボタンを押下すると,SearchButtonPressedが通知されます。
- C#Xamarin.Formsでスマホ開発#01プロジェクト作成の方法
- C#Xamarin.Formsでスマホ開発#02プロジェクトの実行【Android実機編】
- C#Xamarin.Formsでスマホ開発#03エミュレーターでのAndroid接続
- C#Xamarin.Formsでスマホ開発#04 UWPの実行
- C#Xamarin.Formsでスマホ開発#05マルチスタートアッププロジェクトの設定
- C#Xamarin.Formsでスマホ開発#06 StackLayoutの使い方を解説
- C#Xamarin.Formsでスマホ開発#07 VerticalOptionsとHorizontalOptionsの使い方
- C#Xamarin.Formsでスマホ開発#08文字色&背景色とFontsizeの使い方
- C#Xamarin.Formsでスマホ開発#09 Gridの使い方
- C#Xamarin.Formsでスマホ開発#10画面遷移のやり方
- C#Xamarin.Formsでスマホ開発#11 TabbedPageの作り方
- C#Xamarin.Formsでスマホ開発#12 TabbedPageの中身の作り方
- C#Xamarin.Formsでスマホ開発#13 MasterDetailPageの作り方
- C#Xamarin.Formsでスマホ開発#14 ListViewの作り方
- C#Xamarin.Formsでスマホ開発#15 CarouselPageの作り方
- C#Xamarin.Formsでスマホ開発#16 DisplayAlertの使い方
- C#Xamarin.Formsでスマホ開発#17 DisplayActionSheetの使い方
- C#Xamarin.Formsでスマホ開発#18 Deviceごとの処理切り替え方法
- C#Xamarin.Formsでスマホ開発#19 LoadとCloseに代わるもの
- C#Xamarin.Formsでスマホ開発#20 戻るボタンを非表示にする
- C#Xamarin.Formsでスマホ開発#21 ViewCellの共通化のやり方
- C#Xamarin.Formsでスマホ開発##22 Switchの使い方を解説
- C#Xamarin.Formsでスマホ開発#23 コントロールをデータバインドする方法
- C#Xamarin.Formsでスマホ開発#24 Sliderの使い方を解説
- C#Xamarin.Formsでスマホ開発#25 Stepperの使い方を解説
- C#Xamarin.Formsでスマホ開発#26 Entryの使い方を解説
- C#Xamarin.Formsでスマホ開発#27 Editorの使い方を解説
- C#Xamarin.Formsでスマホ開発#28 Pickerの使い方を解説
- C#Xamarin.Formsでスマホ開発#29 Pickerでデータバインディングする方法
- C#Xamarin.Formsでスマホ開発#30 DatePickerとTimePickerの使い方
- C#Xamarin.Formsでスマホ開発#31 SearchBarの使い方を解説
- C#Xamarin.Formsでスマホ開発#32 ToolbarItemの使い方を解説
- C#Xamarin.Formsでスマホ開発#33 TableViewの使い方を解説
- C#Xamarin.Formsでスマホ開発#34 ActivityIndicatorの使い方を解説
- C#Xamarin.Formsでスマホ開発#35 ListViewを下に引っ張て更新する方法