StackLayoutとは?
StackLayoutとは,コントロールを垂直方向または水平方向に順番に並べていくパネルです。ボタンやラベルなどのコントロールを縦方向か横方向かを指定して,置いていきます。
新しいページの作成
StackLayoutを使うには,Xamlを書いていく必要があります。まずは新しいページを作成しましょう。
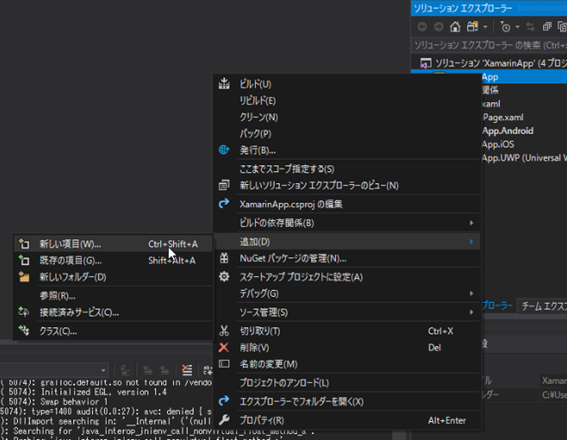
まず「XamarinApp」プロジェクトを右クリックして…
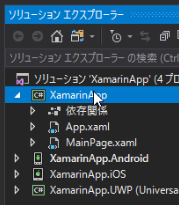
「追加」→「新しい項目」を選択します。
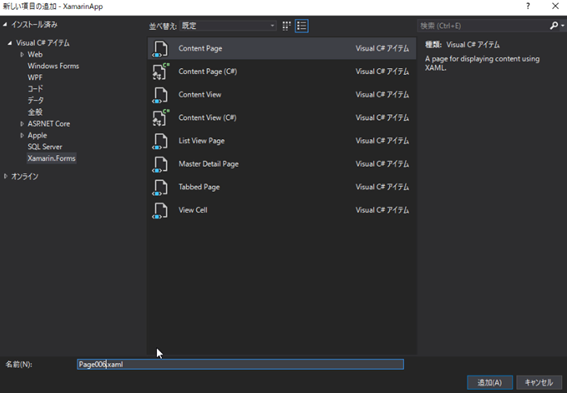
「Content Page」を選択して名前に「Page006.xaml」と入力して「追加」ボタンを押下します。
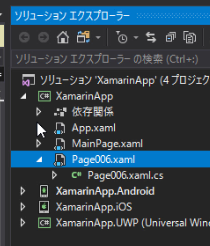
これで新しいページ「Page006」が作成されました。
次に「App.xaml.cs」を開き,「MainPage = new XamarinApp.MainPage();」となっているところを次のように変更します。
public App ()
{
	InitializeComponent();

	MainPage = new XamarinApp.Page006();
}
これで起動すると,Page006が最初に起動するように設定されました。
StackLayoutの使い方
「Page006.xaml」にStackLayoutを記述していきます。
StackLayoutの中に,Labelを2つ配置します。
<StackLayout>
    <Label Text="AAA"/>
    <Label Text="BBB"/>
</StackLayout>
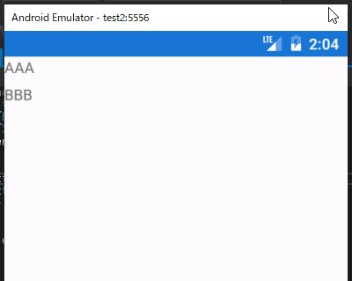
次のように表示されます。
「AAA」と「BBB」は縦方向に整列して並んでいるのがわかります。
Spacingで余白を設定する
このままではLabelと背景色が同じため,コントロール間の余白がどのようになっているのかがわかりません。それぞれのLabelに背景色を設定します。背景は「BackgroundColor」で設定します。
<StackLayout>
    <Label Text="AAA" BackgroundColor="Red"/>
    <Label Text="BBB" BackgroundColor="Blue" TextColor="White"/>
</StackLayout>
「AAA」は背景を「赤」,「BBB」は背景を「青」にしています。「BBB」は青背景で黒文字は見づらいので,文字の色を「白」にしています。文字の色の設定は「TextColor」で行います。 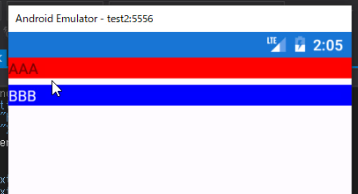
<StackLayout Spacing="0">
    <Label Text="AAA" BackgroundColor="Red"/>
    <Label Text="BBB" BackgroundColor="Blue" TextColor="White"/>
</StackLayout>
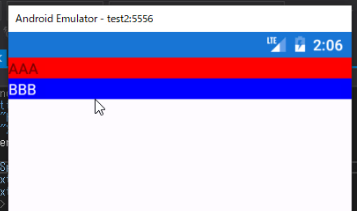
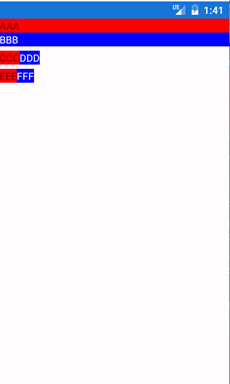
これで余白がなくなったことがわかります。
Orientationで横方向に配置する
StackLayoutは縦方向だけでなく,横方向にも配置することができます。横方向に並べる場合はOrientationをHorizontalにします。Orientationを指定しなければ,デフォルトのVerticalとなり,縦方向に配置されます。それではOrientationをHorizontalに指定しましょう。
<StackLayout>
    <StackLayout Spacing="0">
        <Label Text="AAA" BackgroundColor="Red"/>
        <Label Text="BBB" BackgroundColor="Blue" TextColor="White"/>
    </StackLayout>

    <StackLayout Orientation="Horizontal">
        <Label Text="CCC" BackgroundColor="Red"/>
        <Label Text="DDD" BackgroundColor="Blue" TextColor="White"/>
    </StackLayout>
</StackLayout>
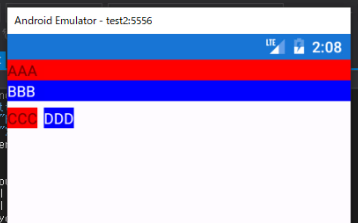
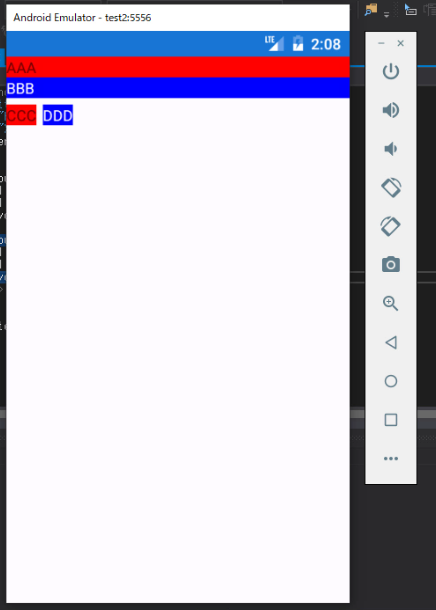
縦方向のStackLayoutの下に,横方向のStackLayoutを配置しています。そしてその二つのStackLayoutを縦方向に並べるために,全体をStackLayoutで囲んでいます。
横方向に配置されているのがわかります。
サンプルコード全体
using System;
using System.Collections.Generic;
using System.Linq;
using System.Text;

using Xamarin.Forms;

namespace XamarinApp
{
	public partial class App : Application
	{
		public App ()
		{
			InitializeComponent();

			MainPage = new XamarinApp.Page006();
		}

		protected override void OnStart ()
		{
			// Handle when your app starts
		}

		protected override void OnSleep ()
		{
			// Handle when your app sleeps
		}

		protected override void OnResume ()
		{
			// Handle when your app resumes
		}
	}
}
<?xml version="1.0" encoding="utf-8" ?>
<ContentPage xmlns="http://xamarin.com/schemas/2014/forms"
             xmlns:x="http://schemas.microsoft.com/winfx/2009/xaml"
             x:Class="XamarinApp.Page006">
    <ContentPage.Content>

        <StackLayout>
            <StackLayout Spacing="0">
                <Label Text="AAA" BackgroundColor="Red"/>
                <Label Text="BBB" BackgroundColor="Blue" TextColor="White"/>
            </StackLayout>

            <StackLayout Orientation="Horizontal">
                <Label Text="CCC" BackgroundColor="Red"/>
                <Label Text="DDD" BackgroundColor="Blue" TextColor="White"/>
            </StackLayout>
        </StackLayout>


    </ContentPage.Content>
</ContentPage>
- C#Xamarin.Formsでスマホ開発#01プロジェクト作成の方法
- C#Xamarin.Formsでスマホ開発#02プロジェクトの実行【Android実機編】
- C#Xamarin.Formsでスマホ開発#03エミュレーターでのAndroid接続
- C#Xamarin.Formsでスマホ開発#04 UWPの実行
- C#Xamarin.Formsでスマホ開発#05マルチスタートアッププロジェクトの設定
- C#Xamarin.Formsでスマホ開発#06 StackLayoutの使い方を解説
- C#Xamarin.Formsでスマホ開発#07 VerticalOptionsとHorizontalOptionsの使い方
- C#Xamarin.Formsでスマホ開発#08文字色&背景色とFontsizeの使い方
- C#Xamarin.Formsでスマホ開発#09 Gridの使い方
- C#Xamarin.Formsでスマホ開発#10画面遷移のやり方
- C#Xamarin.Formsでスマホ開発#11 TabbedPageの作り方
- C#Xamarin.Formsでスマホ開発#12 TabbedPageの中身の作り方
- C#Xamarin.Formsでスマホ開発#13 MasterDetailPageの作り方
- C#Xamarin.Formsでスマホ開発#14 ListViewの作り方
- C#Xamarin.Formsでスマホ開発#15 CarouselPageの作り方
- C#Xamarin.Formsでスマホ開発#16 DisplayAlertの使い方
- C#Xamarin.Formsでスマホ開発#17 DisplayActionSheetの使い方
- C#Xamarin.Formsでスマホ開発#18 Deviceごとの処理切り替え方法
- C#Xamarin.Formsでスマホ開発#19 LoadとCloseに代わるもの
- C#Xamarin.Formsでスマホ開発#20 戻るボタンを非表示にする
- C#Xamarin.Formsでスマホ開発#21 ViewCellの共通化のやり方
- C#Xamarin.Formsでスマホ開発##22 Switchの使い方を解説
- C#Xamarin.Formsでスマホ開発#23 コントロールをデータバインドする方法
- C#Xamarin.Formsでスマホ開発#24 Sliderの使い方を解説
- C#Xamarin.Formsでスマホ開発#25 Stepperの使い方を解説
- C#Xamarin.Formsでスマホ開発#26 Entryの使い方を解説
- C#Xamarin.Formsでスマホ開発#27 Editorの使い方を解説
- C#Xamarin.Formsでスマホ開発#28 Pickerの使い方を解説
- C#Xamarin.Formsでスマホ開発#29 Pickerでデータバインディングする方法
- C#Xamarin.Formsでスマホ開発#30 DatePickerとTimePickerの使い方
- C#Xamarin.Formsでスマホ開発#31 SearchBarの使い方を解説
- C#Xamarin.Formsでスマホ開発#32 ToolbarItemの使い方を解説
- C#Xamarin.Formsでスマホ開発#33 TableViewの使い方を解説
- C#Xamarin.Formsでスマホ開発#34 ActivityIndicatorの使い方を解説
- C#Xamarin.Formsでスマホ開発#35 ListViewを下に引っ張て更新する方法
