今回はStackLayoutの続きで,VerticalOptionsとHorizontalOptionsの使い方を見ていきたいと思います。VerticalOptionsとHorizontalOptionsは,StackLayoutの中で,どこからどんな感じでコントロールを置いていくかを指定するためのモノです。
VerticalOptionsとHorizontalOptions
VerticalOptionsとHorizontalOptionsはコントロールをどのように配置するかを指定するもので,配置方法は次の4種類があります。
- Start:開始位置(左,上)
- 左から右に並べていく場合は,左になります。
- 上から下に並べていく場合は,上になります。
- Center:中央
- 中央に配置します。
- End:終端(右,下)
- 左から右に並べていく場合は,右になります。
- 上から下に並べていく場合は,下になります。
- Fill:全体
- 全体に引き伸ばして配置します。
AndExpand
Start,Center,End,Fillにはそれぞれ「AndExpand」というものがあります。AndExpandを指定すると,残りの余白を占有して配置します。
- StartAndExpand
- CenterAndExpand
- EndAndExpand
- FillAndExpand
横方向の配置サンプルコード
VerticalOptionsとHorizontalOptions指定なし
StackLayoutを置いてOrientationをHorizontalで横向きに並べていきます。Spacingをゼロにすることで,スペースなくコントロールを並べていきます。
最初はLabelをテキストを「AAA」,背景色「赤」で設置します。VerticalOptionsとHorizontalOptionsを指定していないので,どちらもデフォルトの「Fill」扱いとなります。
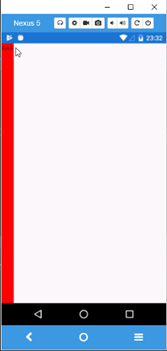
ラベル「AAA」が表示されました。背景色の「赤」が縦には伸びていますが,横には伸びていません。VerticalOptionsとHorizontalOptionsのデフォルトがどちらも「Fill」ならどちらものびてもよさそうですが伸びません。これはStackLayoutの並び順がOrientationをHorizontalで横向きに積んでいるためです。StackLayoutが1つで横向きなので,縦のスペースはFillで埋めることができますが,右側のスペースはコントロールをこれからも積んでいくスペースなので,Fillでは埋まりません。このスペースを埋める場合は「FillAndExpand」にする必要があります。
VerticalOptionsとHorizontalOptionsを「Fill」
テキストを「BBB」,VerticalOptionsとHorizontalOptionsを「Fill」で設置します。
<StackLayout Orientation="Horizontal" Spacing="0">
    <Label Text="AAA" BackgroundColor="Red"/>
    <Label Text="BBB" BackgroundColor="Blue" VerticalOptions="Fill" HorizontalOptions="Fill"/>
</StackLayout>
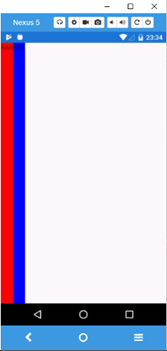
「AAA」と同様の動作を「BBB」もしています。よってデフォルトが「Fill」であることが確認できます。
VerticalOptions「Start」とHorizontalOptions「Start」
テキスト「CCC」をVerticalOptions「Start」とHorizontalOptions「Start」で配置します。
<StackLayout Orientation="Horizontal" Spacing="0">
    <Label Text="AAA" BackgroundColor="Red"/>
    <Label Text="BBB" BackgroundColor="Blue" VerticalOptions="Fill" HorizontalOptions="Fill"/>
    <Label Text="CCC" BackgroundColor="Red" VerticalOptions="Start" HorizontalOptions="Start"/>
</StackLayout>
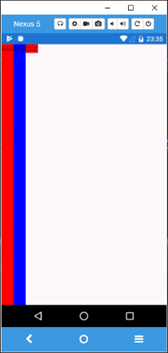
「CCC」は左上に表示され,縦にも横にも余白を埋める伸び方はしません。
VerticalOptions「Start」とHorizontalOptions「FillAndExpand」
「DDD」をVerticalOptions「Start」とHorizontalOptions「FillAndExpand」とします。
<StackLayout Orientation="Horizontal" Spacing="0">
    <Label Text="AAA" BackgroundColor="Red"/>
    <Label Text="BBB" BackgroundColor="Blue" VerticalOptions="Fill" HorizontalOptions="Fill"/>
    <Label Text="CCC" BackgroundColor="Red" VerticalOptions="Start" HorizontalOptions="Start"/>
    <Label Text="DDD" BackgroundColor="Blue" VerticalOptions="Start" HorizontalOptions="FillAndExpand"/>
</StackLayout>
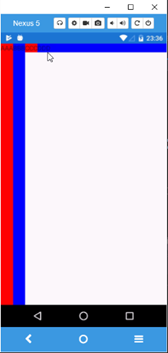
「DDD」は縦方向がStartなので伸びません。横方向はFillAndExpandなので余白を埋めていることがわかります。
VerticalOptions「Start」とHorizontalOptions「FillAndExpand」
「EEE」も「DDD」と同じ設定にして,余白を均等に埋めることを確認します。
<StackLayout Orientation="Horizontal" Spacing="0">
    <Label Text="AAA" BackgroundColor="Red"/>
    <Label Text="BBB" BackgroundColor="Blue" VerticalOptions="Fill" HorizontalOptions="Fill"/>
    <Label Text="CCC" BackgroundColor="Red" VerticalOptions="Start" HorizontalOptions="Start"/>
    <Label Text="DDD" BackgroundColor="Blue" VerticalOptions="Start" HorizontalOptions="FillAndExpand"/>
    <Label Text="EEE" BackgroundColor="Red" VerticalOptions="Start" HorizontalOptions="FillAndExpand"/>
</StackLayout>
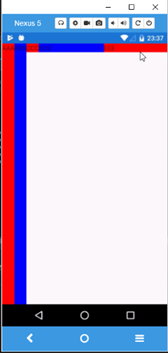
「DDD」と「EEE」で余ったスペースを均等に割り当てていることがわかります。
VerticalOptions「Start」とHorizontalOptions「Start」
最後に「FFF」をVerticalOptions「Start」とHorizontalOptions「Start」にしたときの動きを見てみます。
<StackLayout Orientation="Horizontal" Spacing="0">
    <Label Text="AAA" BackgroundColor="Red"/>
    <Label Text="BBB" BackgroundColor="Blue" VerticalOptions="Fill" HorizontalOptions="Fill"/>
    <Label Text="CCC" BackgroundColor="Red" VerticalOptions="Start" HorizontalOptions="Start"/>
    <Label Text="DDD" BackgroundColor="Blue" VerticalOptions="Start" HorizontalOptions="FillAndExpand"/>
    <Label Text="EEE" BackgroundColor="Red" VerticalOptions="Start" HorizontalOptions="FillAndExpand"/>
    <Label Text="FFF" BackgroundColor="Blue" VerticalOptions="Start" HorizontalOptions="Start"/>
</StackLayout>
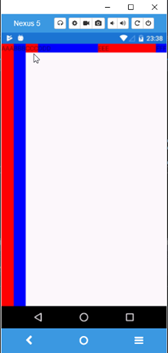
「DDD」「EEE」は余ったスペースを埋めますが,最後の「FFF」も必要なスペースで配置されています。
縦方向の配置サンプルコード
縦方向のパターンも検証してみます。
すでに横方向のStackLayoutが存在するのでその下にもう一つStackLayoutを配置しますが,それではStackLayoutがあと勝ちになって,一つ目のStackLayoutが表示されなくなります。そこで二つのStackLayoutを並べるためのStackLayoutをもっとも外側に記述します。その中に「GGG」ラベルをVerticalOptions「Start」とHorizontalOptions「Start」で配置します。
<StackLayout>
    <StackLayout Orientation="Horizontal" Spacing="0">
        <Label Text="AAA" BackgroundColor="Red"/>
        <Label Text="BBB" BackgroundColor="Blue" VerticalOptions="Fill" HorizontalOptions="Fill"/>
        <Label Text="CCC" BackgroundColor="Red" VerticalOptions="Start" HorizontalOptions="Start"/>
        <Label Text="DDD" BackgroundColor="Blue" VerticalOptions="Start" HorizontalOptions="FillAndExpand"/>
        <Label Text="EEE" BackgroundColor="Red" VerticalOptions="Start" HorizontalOptions="FillAndExpand"/>
        <Label Text="FFF" BackgroundColor="Blue" VerticalOptions="Start" HorizontalOptions="Start"/>
    </StackLayout>

    <StackLayout Orientation="Vertical" Spacing="0">
        <Label Text="GGG" BackgroundColor="Red" VerticalOptions="Start" HorizontalOptions="Start"/>
    </StackLayout>
</StackLayout>
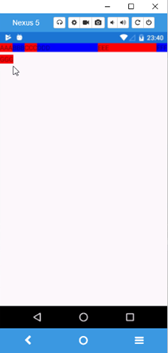
「GGG」は「AAA」から始まる横方向のStackLayoutの下に表示されました。VerticalOptions「Start」とHorizontalOptions「Start」なので,左上に表示されています。
VerticalOptions「Fill」とHorizontalOptions「Fill」
「HHH」をVerticalOptions「Fill」とHorizontalOptions「Fill」で配置します。
<StackLayout>
    <StackLayout Orientation="Horizontal" Spacing="0">
        <Label Text="AAA" BackgroundColor="Red"/>
        <Label Text="BBB" BackgroundColor="Blue" VerticalOptions="Fill" HorizontalOptions="Fill"/>
        <Label Text="CCC" BackgroundColor="Red" VerticalOptions="Start" HorizontalOptions="Start"/>
        <Label Text="DDD" BackgroundColor="Blue" VerticalOptions="Start" HorizontalOptions="FillAndExpand"/>
        <Label Text="EEE" BackgroundColor="Red" VerticalOptions="Start" HorizontalOptions="FillAndExpand"/>
        <Label Text="FFF" BackgroundColor="Blue" VerticalOptions="Start" HorizontalOptions="Start"/>
    </StackLayout>

    <StackLayout Orientation="Vertical" Spacing="0">
        <Label Text="GGG" BackgroundColor="Red" VerticalOptions="Start" HorizontalOptions="Start"/>
        <Label Text="HHH" BackgroundColor="Blue" VerticalOptions="Fill" HorizontalOptions="Fill"/>
    </StackLayout>
</StackLayout>
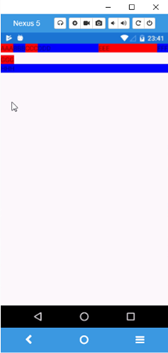
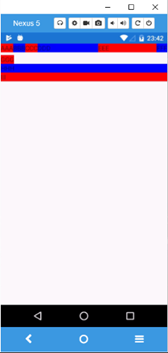
「HHH」は横方向には伸びますが,縦方向には伸びません。これはこのStackLayoutが縦方向に積んでいく並びなので,縦方向はAndExpandにしないと伸びません。横方向は,そもそもコントロールを配置する予定のないスペースなので「Fill」を指定するだけで伸びます。
VerticalOptions「FillAndExpand」とHorizontalOptions「FillAndExpand」
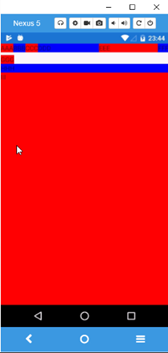
最後に「III」をVerticalOptions「FillAndExpand」とHorizontalOptions「FillAndExpand」にした結果を見てみます。両方をFillAndExpandにしているため,縦にも横にも伸びそうに思いますが,結果は異なります。
<StackLayout>
    <StackLayout Orientation="Horizontal" Spacing="0">
        <Label Text="AAA" BackgroundColor="Red"/>
        <Label Text="BBB" BackgroundColor="Blue" VerticalOptions="Fill" HorizontalOptions="Fill"/>
        <Label Text="CCC" BackgroundColor="Red" VerticalOptions="Start" HorizontalOptions="Start"/>
        <Label Text="DDD" BackgroundColor="Blue" VerticalOptions="Start" HorizontalOptions="FillAndExpand"/>
        <Label Text="EEE" BackgroundColor="Red" VerticalOptions="Start" HorizontalOptions="FillAndExpand"/>
        <Label Text="FFF" BackgroundColor="Blue" VerticalOptions="Start" HorizontalOptions="Start"/>
    </StackLayout>

    <StackLayout Orientation="Vertical" Spacing="0">
        <Label Text="GGG" BackgroundColor="Red" VerticalOptions="Start" HorizontalOptions="Start"/>
        <Label Text="HHH" BackgroundColor="Blue" VerticalOptions="Fill" HorizontalOptions="Fill"/>
        <Label Text="III" BackgroundColor="Red" VerticalOptions="FillAndExpand" HorizontalOptions="FillAndExpand"/>
    </StackLayout>
</StackLayout>
<StackLayout>
    <StackLayout Orientation="Horizontal" Spacing="0">
        <Label Text="AAA" BackgroundColor="Red"/>
        <Label Text="BBB" BackgroundColor="Blue" VerticalOptions="Fill" HorizontalOptions="Fill"/>
        <Label Text="CCC" BackgroundColor="Red" VerticalOptions="Start" HorizontalOptions="Start"/>
        <Label Text="DDD" BackgroundColor="Blue" VerticalOptions="Start" HorizontalOptions="FillAndExpand"/>
        <Label Text="EEE" BackgroundColor="Red" VerticalOptions="Start" HorizontalOptions="FillAndExpand"/>
        <Label Text="FFF" BackgroundColor="Blue" VerticalOptions="Start" HorizontalOptions="Start"/>
    </StackLayout>

    <StackLayout Orientation="Vertical" Spacing="0" VerticalOptions="FillAndExpand">
        <Label Text="GGG" BackgroundColor="Red" VerticalOptions="Start" HorizontalOptions="Start"/>
        <Label Text="HHH" BackgroundColor="Blue" VerticalOptions="Fill" HorizontalOptions="Fill"/>
        <Label Text="III" BackgroundColor="Red" VerticalOptions="FillAndExpand" HorizontalOptions="FillAndExpand"/>
    </StackLayout>
</StackLayout>
サンプルコード全体
<?xml version="1.0" encoding="utf-8" ?>
<ContentPage xmlns="http://xamarin.com/schemas/2014/forms"
             xmlns:x="http://schemas.microsoft.com/winfx/2009/xaml"
             xmlns:local="clr-namespace:X007"
             x:Class="X007.MainPage">


    <StackLayout>
        <StackLayout Orientation="Horizontal" Spacing="0">
            <Label Text="AAA" BackgroundColor="Red"/>
            <Label Text="BBB" BackgroundColor="Blue" VerticalOptions="Fill" HorizontalOptions="Fill"/>
            <Label Text="CCC" BackgroundColor="Red" VerticalOptions="Start" HorizontalOptions="Start"/>
            <Label Text="DDD" BackgroundColor="Blue" VerticalOptions="Start" HorizontalOptions="FillAndExpand"/>
            <Label Text="EEE" BackgroundColor="Red" VerticalOptions="Start" HorizontalOptions="FillAndExpand"/>
            <Label Text="FFF" BackgroundColor="Blue" VerticalOptions="Start" HorizontalOptions="Start"/>
        </StackLayout>

        <StackLayout Orientation="Vertical" Spacing="0" VerticalOptions="FillAndExpand">
            <Label Text="GGG" BackgroundColor="Red" VerticalOptions="Start" HorizontalOptions="Start"/>
            <Label Text="HHH" BackgroundColor="Blue" VerticalOptions="Fill" HorizontalOptions="Fill"/>
            <Label Text="III" BackgroundColor="Red" VerticalOptions="FillAndExpand" HorizontalOptions="FillAndExpand"/>

        </StackLayout>
    </StackLayout>


</ContentPage>
- C#Xamarin.Formsでスマホ開発#01プロジェクト作成の方法
- C#Xamarin.Formsでスマホ開発#02プロジェクトの実行【Android実機編】
- C#Xamarin.Formsでスマホ開発#03エミュレーターでのAndroid接続
- C#Xamarin.Formsでスマホ開発#04 UWPの実行
- C#Xamarin.Formsでスマホ開発#05マルチスタートアッププロジェクトの設定
- C#Xamarin.Formsでスマホ開発#06 StackLayoutの使い方を解説
- C#Xamarin.Formsでスマホ開発#07 VerticalOptionsとHorizontalOptionsの使い方
- C#Xamarin.Formsでスマホ開発#08文字色&背景色とFontsizeの使い方
- C#Xamarin.Formsでスマホ開発#09 Gridの使い方
- C#Xamarin.Formsでスマホ開発#10画面遷移のやり方
- C#Xamarin.Formsでスマホ開発#11 TabbedPageの作り方
- C#Xamarin.Formsでスマホ開発#12 TabbedPageの中身の作り方
- C#Xamarin.Formsでスマホ開発#13 MasterDetailPageの作り方
- C#Xamarin.Formsでスマホ開発#14 ListViewの作り方
- C#Xamarin.Formsでスマホ開発#15 CarouselPageの作り方
- C#Xamarin.Formsでスマホ開発#16 DisplayAlertの使い方
- C#Xamarin.Formsでスマホ開発#17 DisplayActionSheetの使い方
- C#Xamarin.Formsでスマホ開発#18 Deviceごとの処理切り替え方法
- C#Xamarin.Formsでスマホ開発#19 LoadとCloseに代わるもの
- C#Xamarin.Formsでスマホ開発#20 戻るボタンを非表示にする
- C#Xamarin.Formsでスマホ開発#21 ViewCellの共通化のやり方
- C#Xamarin.Formsでスマホ開発##22 Switchの使い方を解説
- C#Xamarin.Formsでスマホ開発#23 コントロールをデータバインドする方法
- C#Xamarin.Formsでスマホ開発#24 Sliderの使い方を解説
- C#Xamarin.Formsでスマホ開発#25 Stepperの使い方を解説
- C#Xamarin.Formsでスマホ開発#26 Entryの使い方を解説
- C#Xamarin.Formsでスマホ開発#27 Editorの使い方を解説
- C#Xamarin.Formsでスマホ開発#28 Pickerの使い方を解説
- C#Xamarin.Formsでスマホ開発#29 Pickerでデータバインディングする方法
- C#Xamarin.Formsでスマホ開発#30 DatePickerとTimePickerの使い方
- C#Xamarin.Formsでスマホ開発#31 SearchBarの使い方を解説
- C#Xamarin.Formsでスマホ開発#32 ToolbarItemの使い方を解説
- C#Xamarin.Formsでスマホ開発#33 TableViewの使い方を解説
- C#Xamarin.Formsでスマホ開発#34 ActivityIndicatorの使い方を解説
- C#Xamarin.Formsでスマホ開発#35 ListViewを下に引っ張て更新する方法
